How To Take Beautiful Photos for Your DIY Project
Congratulations on completing that do-it-yourself project! That random idea ran you ragged, but you made it to the finish line! Friends and family have come to admire your work, but now you want to share it with the internet. Unfortunately, taking beautiful photos has proved tricky. What are you doing wrong?
From Instagram to Pinterest, you see beautiful photos everywhere. Adding yours to the mix demands a few pointers to improve your photography skills. Don’t worry, though, because Waverly Cabinets is here to help.
Make that phone work for you.
Most people won’t purchase new cameras for their photos. They open their camera app and then hope for the best. It’s how most of us operate, honestly. Whether you’re on an Android or iPhone, everyone defaults to their built-in camera for photo opportunities.
Learning to work with what you’ve got is the key to success. Here are some useful features on the latest Android and iPhone models to take advantage of:
Android
Use the Grid Guide
Open the camera app, and then open the camera settings. You should see the toggle for the grid and guides. With this feature enabled, you’ll see grey lines dividing your screen into nine equal parts.
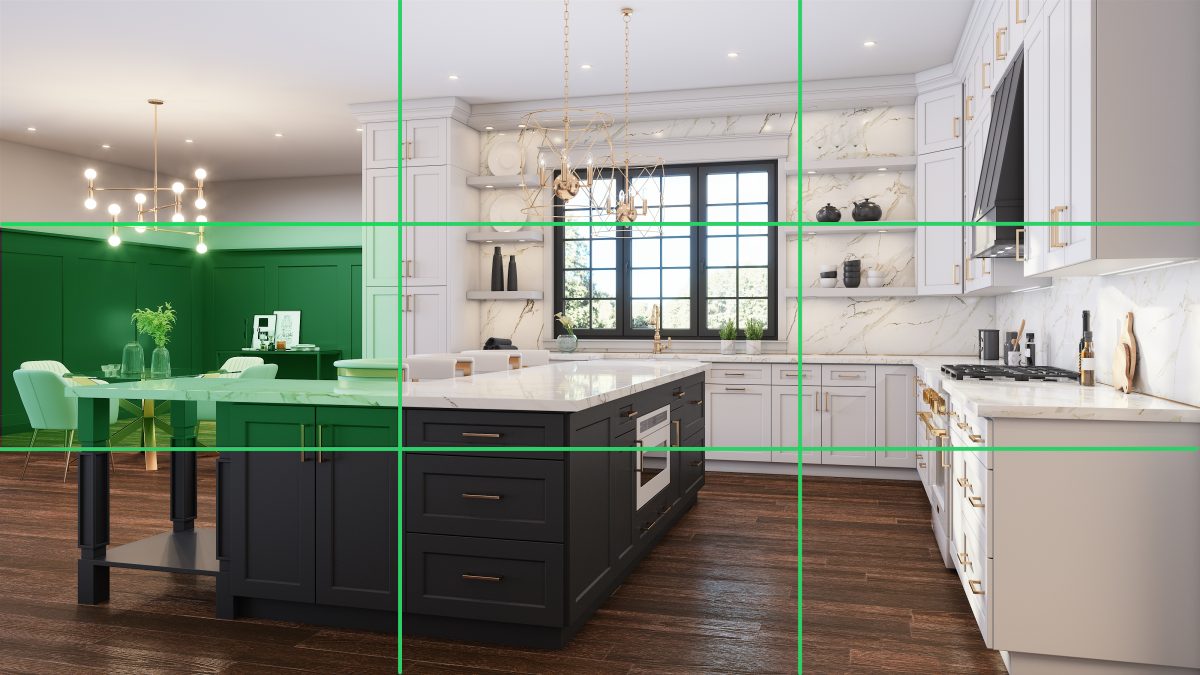
Focus your camera on an area that is outside of the center box. It creates a focal point that gives harmony and balance to the photo. Check out the photo above.
We divided the photo into nine equal parts and highlighted the focal point. If you look closely, you’ll notice the focal point is off-center, and the lines are parallel with the grid.
Enable Pro mode
Open the camera app, and change the camera mode to more. Once the menu comes up, the pro mode should be among the first available options. With this feature enabled, you can adjust every setting to your preference.
After enabling this setting, you’ll be back on the main screen. Above the shutter button, you’ll see a bar of new settings. It’s photography without training wheels.
Play with the buttons to find settings that appeal to you. Read more about these settings here.
Turn on the automatic HDR.
Open the camera app and tap the HDR Icon. It should be the icon next to your flash setting. Once you find the icon, tap the option called “HDR Auto.”
HDR is an abbreviation of the term High Dynamic Range, and it’s another way to get the most out of your camera. It’s a way to capture more dynamic ranges in a single shot. It won’t always be ideal for your situation, though. We suggest a few test shots before you decide if you like it.
Enable Burst Shot or Single Take
Open the camera app, and then tap Settings. You should see Burst Shot as an option. Enable that setting, and then return to the main screen.
Not every Android phone has this option, so you may want to look for a feature called “Single Take.” It should show up when swiping through modes in your camera app. Burst Shot allows you to take multiple photos by holding the shutter button. Single shot is a similar feature, except you press the shutter button once.
These features allow you to take the same shot at different angles to find what works best.
Use 10-Bit color
Open the camera app, and then tap the Settings button. You should see a list of options. Scroll until you find your color settings. Enable the one called “10-Bit Color.”
With this enabled, you’ll capture more color detail in your photos. It allows your phone to capture over 1024 tones of each primary color, which results in a photograph with over a billion unique colors. The only downfall is how much extra space these photos take up.
iPhone
Manual Exposure
Open the camera app. Tap the screen to show the automatic focus area and exposure setting. Tap where you want to move the focus area. Next to the focus area, drag your finger up or down to adjust the exposure. Apple’s AI is good at setting the proper exposure. However, it lacks your creative vision. We suggest playing with it to see how you like the shot at different settings.
Burst Mode
Open the camera app. Hold the shutter button and drag your finger to the left. Keep holding the shutter button. Release the shutter button to end burst mode. Like Android, this mode will help you take more than one shot at different angles. Carefully look through them to find the shot that makes you happy.
Shoot In Max Resolution
Open your settings and navigate to the camera tab. You should see a setting called “Formats.” The setting you’re looking for is “High Efficiency.” Enabling this setting allows you to shoot in greater detail. However, these files take up more space and are not compressed. There may not be a noticeable difference between photos with and without this feature. We suggest doing a side-by-side comparison to find out if it fits you.
Smart HDR
Open your settings, and then navigate to the camera tab. Scroll through the menu until you see “Smart HDR.” When enabled, this setting adjusts your HDR settings accordingly. It operates the same way on iPhone as it does on Android.
The Grid Feature
Open your settings and navigate to the camera tab. Scroll until you see an option for “Grid and Level.” It functions similarly to Android, so there’s no need to explain the perks.
Lens Correction
Open your settings and navigate to the camera tab. Scroll until you see an option called “Lens Correction.” It’s a feature that corrects the distortion in camera lenses. It helps you capture more true-to-life photos. If there’s a similar setting for Android, we haven’t found it.
Set up a beautiful scene.
We should have that camera phone setup the way you like. Let’s talk about setting up a good scene for your photograph:
1: Clean up your space.
Clean up your space and situate your stage items appropriately. Your focus point should be off-center. Make sure your focus point is the busiest area. Clear everything else out that distracts from the focus.
2: Let in natural light.
Open the windows and flood that space with some natural light! Choose a time of day that gives the most light to that space. If you lack natural light, install full specturm light bulbs to mimic natural light.
3: Line up your shot.
Make sure to line up your straight lines with the grid. If your space is awkward, then create interest with positioning. Like this photo:
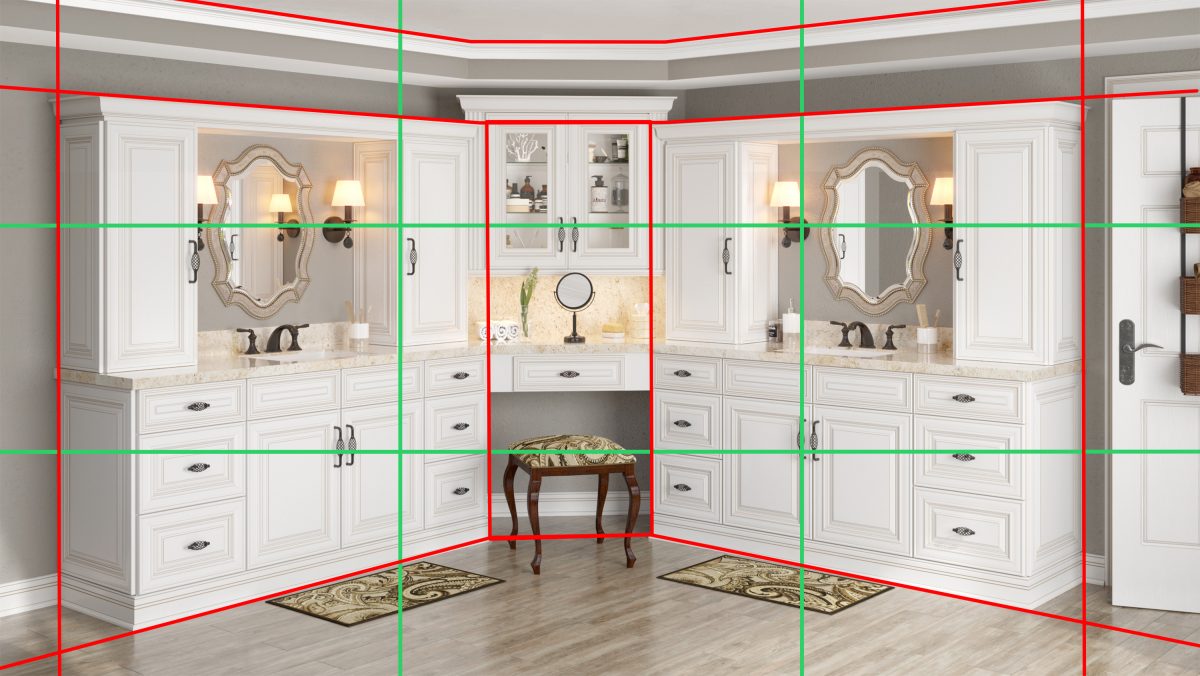
The green lines represent the grid. The red lines are the positioning of the straight lines on that grid. Notice that the vanity is off-center. The lines follow the grid to flow towards the vanity for a clear focus.
The idea is to give the eyes a clear path to follow.
4: Find the right angle.
Finding the right angle will demand a few test shots. People read from left to right, so position your focus point accordingly! Let their eyes fall on the focus point and follow those lines through your photo. Don’t position your focus point in a way that closes it off from the rest of the scene.
If you’re showing off a wide area, step back to capture as much of it as possible. Wider shots can be a little busier in staging, but don’t over crowd them.
Step closer to your scene to highlight finer details. Make sure to clean up your focus point.
5: Play with your settings.
We didn’t turn those settings on for nothing! Play around with them and find out what works best for you. Take the time to find out what settings give you the best results.
There’s no shortcut to a good photo.
Show off your hard work!
If you used these tips and tricks to capture your work, share them with us on social media. We like to know that we’re able to help people with our knowledge. You can find us on:
We’d love to see how it went!