
7 Easy Steps to Measure for New Kitchen Cabinets
Last Modified July 24, 2026
A kitchen renovation is an exciting yet daunting task, especially when you measure for new kitchen cabinets. Understanding how to accurately measure your kitchen is crucial for a seamless fit. In this guide, we’re going to teach you how to measure for new kitchen cabinets and help you avoid common mistakes. Materials Needed to Measure for New Kitchen Cabinets […]

A kitchen renovation is an exciting yet daunting task, especially when you measure for new kitchen cabinets. Understanding how to accurately measure your kitchen is crucial for a seamless fit. In this guide, we’re going to teach you how to measure for new kitchen cabinets and help you avoid common mistakes.
Materials Needed to Measure for New Kitchen Cabinets
Tip: Read through the planner and kitchen information before you begin to measure for new kitchen cabinets. This helps you understand what information you need.
- Measuring Tape
- Layout Planner
- Kitchen Information Sheet
- Pencil
- Stepladder (if needed)
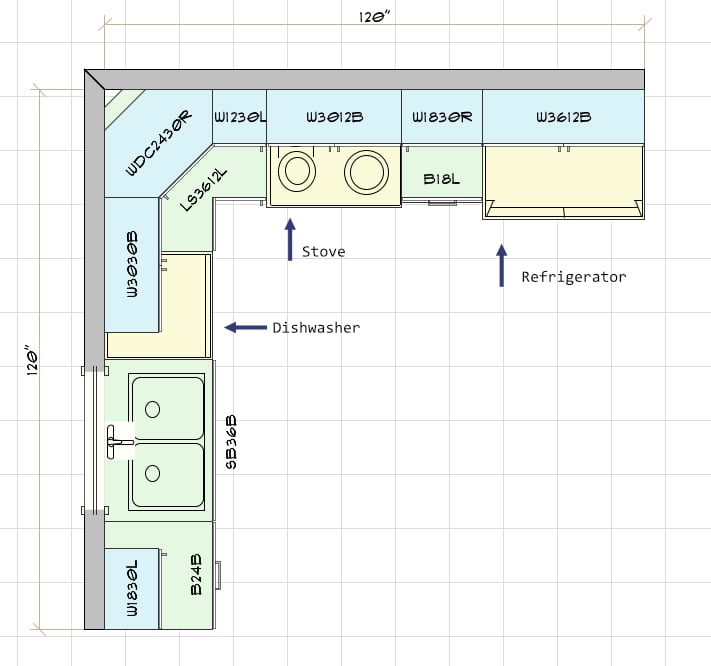
Prepare to Measure Your Kitchen
- Remove any obstacles that you could trip over.
- Ensure good lighting for the right measurements.
First, you need to clear away any obstacles that you could trip over. Clear away clutter and close any open cabinet doors. If you’re working with an oddly shaped room, make sure you have a clear line of sight. Second, make sure your lighting is good enough to record the right measurements. Mistakes in measuring for new kitchen cabinets are detrimental to your project.
Step 1: Draw a Basic Floor Plan
- Sketch your kitchen layout on graph paper.
If you’re building a new space, sketch the layout you want. For existing spaces, sketch out the basic shape of the room. Use the layout planner that you downloaded earlier. We’re not looking for exact measurements at this point.
Step 2: Measure the Walls
- Measure the length of each wall from corner to corner.
- Measure the wall height from floor to ceiling.
If you’re building a new space, then measure where the walls will be. Make sure to compensate for the space that drywall and insulation will occupy. If you’re remodeling an oddly shaped room, then divide the area and measure each space individually.
Take the measurements for the larger space first, and then measure the smaller areas. Mark these measurements on your layout planner. You should have the basic shape of your space drawn already.
Measure your wall height. If your ceiling is slanted, then measure the wall height where your cabinets are to be installed. Mark these measurements on the layout planner.
Step 3: Measure Window and Door Openings
- Measure the width and height of each window and door.
- Measure the distance from the floor to the bottom of each window.
- Measure the distance on either side of the door or window in relation to where it’s installed.
Understanding where your doors and windows sit will help designers create a storage solution that works for you. Mark the location of each window and door. Record the measurements on the layout planner to include the distance on either side.
Step 4: Mark Outlets, Pipes, and Wiring
- Mark everything on the layout planner that can’t be moved.
Mark details of your space that can’t be moved, such as wiring and outlets. Don’t forget to indicate where your pipes are. Use the layout planner that you downloaded earlier.
This will help ensure that your cabinets fit and look flawless.
Step 5: Check Appliance Dimensions
- Download the Kitchen Information form.
- Tell us about your appliances.
Fill out the Kitchen Information form that you downloaded earlier. Provide as much information as you can. It will help your designer understand how to create your cabinet design.
Step 6: Double-Check All Measurements
- Re-measure everything to ensure accuracy.
- Have someone else verify your measurements if possible.
It’s important to provide your designer with accurate measurements. It’s better to catch any mistakes early, rather than uncovering them during installation. Accurate numbers ensure that your cabinets fit and function properly.
Step 7: Take photos of your space for reference.
Before you wrap up, don’t forget to take clear, well-lit photos of your kitchen from multiple angles. These photos will serve as a visual reference for both you and your designer. They can help clarify the layout, highlight unique features, and ensure that nothing is overlooked during the design process.
Having these photos on hand can also help you make decisions that complement your space.
Final Tips
- Always measure in inches.
- Take photos of your kitchen for reference when shopping.
Accurate measurements are the foundation of a successful kitchen cabinet installation. By following these steps—from sketching your floor plan to double-checking dimensions—you’ll ensure a smooth design and installation process. Taking the time to measure carefully now will save you from costly mistakes and delays later. With your detailed notes, photos, and completed planner in hand, you’re ready to collaborate with your designer and bring your dream kitchen to life.
Happy remodeling! Follow us on Facebook or Instagram.
Ask an Expert
Table of Contents
LATESTS POSTS
- The Best Countertops for Green Kitchen Cabinets (6 Pairings That Work)

- Green Kitchen Cabinets: 4 Real Shades, Real Prices (No Showroom Guesswork)
- The Kitchen Grease Battle: Is a Waterborne UV Finish Your Secret Weapon?
- The Ultimate Checklist for Buying RTA Cabinets Online—with Confidence

Newest Door Style
-

-
Blackwood
Obsidian Oak
Shop Now10'x10' Kitchen Starting at
$9,319.00$4,659.50Only $3,727.60 with
fall20
SOCIAL LINKS
Frequently Asked Questions
What tools do I need to measure for new kitchen cabinets?
You’ll need a measuring tape, a pencil, a layout planner, a kitchen information sheet, and a stepladder if you have tall walls or upper cabinets to measure. Having these ready before you start helps you avoid interruptions mid-measurement.
What’s the most common mistake people make when measuring for new kitchen cabinets?
Forgetting to account for drywall and insulation thickness in new construction, and skipping a second round of verification measurements, are two of the most frequent errors. Both can lead to cabinets that don’t fit properly once installed.
How do I measure an oddly shaped or L-shaped kitchen?
Divide the space into smaller sections and measure each wall or segment individually, starting with the largest area first. Mark each measurement on your layout planner as you go so the shape stays accurate.
Do I need to measure appliances too?
Yes. Recording your appliance dimensions on a kitchen information sheet helps your designer plan cabinet spacing and clearances correctly, especially around refrigerators, ranges, and dishwashers.
Should I take photos in addition to measurements?
Yes. Clear, well-lit photos from multiple angles give your designer visual context that numbers alone can’t capture, and they help you remember details like outlet placement or unique architectural features.
Do I need to measure and mark gaps, windows, and doors?
Yes. Record the width, height, and placement of every window, door, and gap on your layout planner, including how much space is on either side. This gives your designer the details they need to plan cabinets that fit cleanly around these features. This is an important step when you measure for new kitchen cabinets.
Should I measure for new kitchen cabinets before or after installing flooring?
Measure after your flooring is installed, or account for its exact thickness if it’s not in yet. Flooring height affects your wall measurements and where your base cabinets and toe kicks will sit, so measuring too early can throw off the fit.
What happens if my measurements are slightly off?
Even small errors, like an inch or two, can cause cabinets to fit poorly or leave awkward gaps once installed. This is why the double-check step matters: re-measuring and having a second person verify your numbers before submitting them catches most mistakes before they become costly.
Can I measure for new kitchen cabinets myself, or should I hire a professional?
Many homeowners measure their own kitchens successfully by following a guide like this one and double-checking their work. That said, if your kitchen has unusual angles, structural quirks, or you’re simply not confident in the numbers, having a professional verify your measurements can offer peace of mind before you finalize your order.
What do I do with my measurements once I’m done?
Once your measurements, photos, and completed forms are ready, submit them to your designer or request a quote so they can start planning your cabinet layout. Having everything organized upfront helps speed up the design process and reduces back-and-forth revisions.
Do I need to remove my old kitchen cabinets before I measure for knew kitchen cabinets?
Not necessarily. You can measure your existing kitchen with the old cabinets still in place, as long as you clearly note their current dimensions and locations. If you’re planning a different layout, though, it helps to measure the room’s actual wall-to-wall dimensions as well, so your designer knows the full space you have to work with.
What if my walls aren’t perfectly leveled or squared?
This is common, especially in older homes, so take measurements at multiple points along each wall, such as the top, middle, and bottom, rather than just once. Note any variations on your layout planner so your designer can plan for fillers or adjustments that keep your cabinets looking level and properly aligned.
Does ceiling height or crown molding affect my cabinet measurements?
Yes. Taller ceilings may mean extra space above your upper cabinets that needs to be filled or accounted for, and crown molding adds height that should be factored into your overall wall measurement. Be sure to note your ceiling height and whether you’re planning to add molding so your designer can recommend the right cabinet height and any necessary fillers.
Should I leave room for cabinet hardware like handles and knobs when I measure for new kitchen cabinets?
Yes, especially near walls, appliances, and corners where handles or knobs could interfere with doors, drawers, or adjacent surfaces. Leaving a couple of inches of clearance in these tight spots ensures your cabinets open fully and hardware doesn’t bump into nearby walls or appliances. Mark it on the layout planner for your designer to discuss with you later.